|
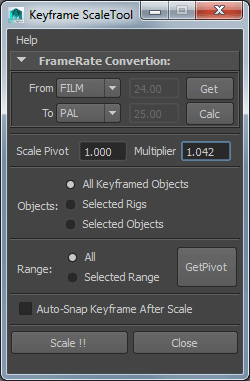
1.Open UI: 2.Input a frame number as the scale pivot. 3.Input a float as the multiplier. 4.Config the target objects mode and time mode. 5.If you want to keep all keyframes at integer frame,check on "Auto-Snap Keyframe After Scale". 6.Press the "Scale !!" button to actually scale the animation.
Source frameRate:It is often the frame rate of current scene. Use "Get" button to get current scene frameRate. Target frameRate: It is the target frame rate of current scene will be converted to. After scaling you can change frameRate in maya's preference window. Press "Clac" button to calculate and put that result float into the multiplier floatField.
All Keyframed objects : Scale all animation of current scene. Selected Rig: Scale all animation of current selected rig. Selected Objects : Scale only the animation of current selected objects.
All: All animation will be scaled. Selected Range:Only the animation in the selected time range will be scaled.
|