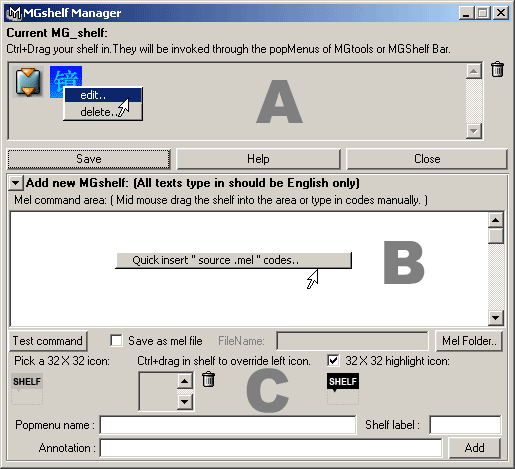
Section A : all embed shelf / mel will be listed in this area. Section A : all embed shelf / mel will be listed in this area.
Save button: Click to actually save shelves in this area.
 Tips: Right click the shelf in this area: Tips: Right click the shelf in this area:
edit : Put this shelf into the edit section of B and C.
delete : Delete the shelf. U can mid mouse button drag the shelf of this area onto the trashcan icon on the right side.
Section B : This scroll field holds the mel codes when editing the shelf of section A. U can type in your mel codes manually in as well.
Test command button: Debug the codes in the scroll field.
Save as mel file : Save mel codes in the scroll field as an .mel file ,and put sourcing this file codes instead.
Tips: Right mouse button clicking on the scroll field:
Quick insert "source .mel" codes..: Select it then pick mel file dialog will popup. Select the mel file U want then corresponding source codes will be put in the scroll field.
Section C : Edit the label/ image overlay name, annotation of the shelf here.
First icon: Click to pick a 32*32 bitmap file as the icon of the shelf.
Second shelf area: Simply ctrl+mid mouse button to drag a shelf icon from maya shelves into this area to override the icon of the shelf.
Third icon: Click to pick a 32*32 bitmap file as the hightlight icon of the shelf.
 After editing a shelf in section B/C, click Add button to submit it. After editing a shelf in section B/C, click Add button to submit it.
If U are satisfied with all the edit ,click Save button to actually save all editing or all will be accepted as "cancel".
|