|
 Advanced Recovery Wizard: Advanced Recovery Wizard:
|
Right click on minitoolBox icon and select "Advanced Recovery Wizard.." . Or you can choose "Automatic Recovery Wizard.." ,but use the second advanced recovery mode .
What make it different from automatic recovery, are that it display the rescue point for you to choose to use them or not, meanwhile, you can manually pick rescue points .
|
Advanced Recovery Wizard UI:
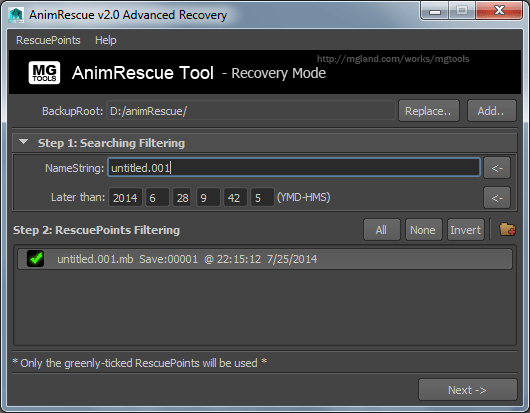
Click the "Replace.." button to set the folder which this tool use to search the eligible rescue points. Old result will be replaced.
Click the "Add.." button to add the folder which this tool use to search the proper rescue points. New eligible rescue points will be added into old result.
 Tips: The backup root dir setting here has nothing to do with the backup root dir. It is just a temporary setting for searching purpose. Tips: The backup root dir setting here has nothing to do with the backup root dir. It is just a temporary setting for searching purpose.
 Step 1: Searching Filtering: Set a name string and a date that used to filter the rescue points. The result rescue points must start with the name string, and later than the date. Only the ones that meet the two conditions will be listed.Click the “<-” buttons to get current scene's name and last modified date into the input fields. Step 1: Searching Filtering: Set a name string and a date that used to filter the rescue points. The result rescue points must start with the name string, and later than the date. Only the ones that meet the two conditions will be listed.Click the “<-” buttons to get current scene's name and last modified date into the input fields.
Step 2: RescuePoints Filtering: Only the checked-on rescue points will be used. Each rescue point have scene name, save times, save date information with it.
You can use "All" "None" "Invert" button to quickly checked on / off these rescue points.
Press on the  button to manually add a rescue point in. button to manually add a rescue point in.
The dir picked should either be the folder under the backup root dir start with the scene name, or their sub folders, which record the save times.
Click the "Next ->" button and the "Recover!!" button to begin recovering.
|