1. Make sure you have MG-Picker Studio installed for Maya.
It is totally free of charge to load & use mgpicker using this tool, free download available here.
Follow the intruction in the installation package to install it.
2. Unzip the downloaded .zip picker data to anywhere in your local disk,
LMB drag the .mgpkr file and drop it upon MG-Picker Studio in Maya to load it.
Alternatively, double click on the empty area of tool, browse and pick the .mgpkr file to load it.
3. Make sure MG-Picker Studio is currently active window,
press "Ctrl+Shift+Alt+S" to set the picker's namespace to the namespace you use for your reference.
The picker works only if its namespace is the same as your reference's.
4. Enjoy!
1. With MG-Picker Studio be downloaded and installed for Maya, go to My Documents/maya/MG_PickerData/Default folder, unzip the downloaded picker zip within it.
The .mgpkr file will be of path like this: "My Documents/maya/MG_PickerData/Default/PickerName/PickerName.mgpkr".
"Default" is the initial picker project directory of MG-Picker Studio, if you have set the picker project to other name, the picker data has to be stored within the project folder you set instead.
2. Create reference of your rig, make sure you your reference has namespace similar to the picker's ,say picker's namespace is "myRig", your reference namespace should be something like "myRig", "myRig1", etc.
3. Select any part of your reference, alt + LMB double click on the empty area in MG-Picker Studio (Animation mode) to load the picker.
4. Enjoy!
First, Depends on the similarity of old and new rig, this task may be easy or not that easy. If rigs are from same rigger and use the same naming conversion, the task will be much more easier.
1. Create reference to your new rig, change the namespace of it to the typical one in Maya's Reference Editor.
2. In designer mode, open up the old picker file, use "Ctrl+Shift+S" hotkey to save it as a new picker file with the new rig name.
3. Snapshot to update the panel images, active ![]() tool and use it to pick and move the buttons, hold "Alt" key to move them in a mirrored way. use hotkey T to transform selected buttons, etc.
tool and use it to pick and move the buttons, hold "Alt" key to move them in a mirrored way. use hotkey T to transform selected buttons, etc.
4. Press "Ctrl+Shift+Alt+S" to set the picker's namespace to the namespace of the new rig.
5. For now the picker buttons may already work, depending the naming rules of new & old rigs.
If the same control of two rigs are like so: oldRig:oldRig_left_hand, newRig:newRig_left_hand, you can see that beside namespace, they also have a prefix of character name of their own.
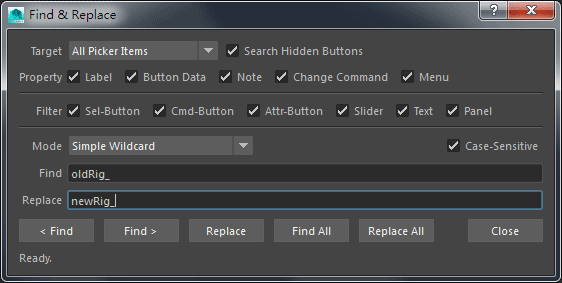
For this kind of situation, use "Ctrl+F" hotkey, to bring up "Find & Replace" dialog, this dialog enables you to quickly find and replace the string in select-button's member list, command code of command-button, attribute name of attribute-button and sliders, label of text, etc.

Setup the find string and replace string, and press "Replace All" button.
Now select-buttons, sliders, attribute-buttons may all works.
6. For command buttons, it depends on how portable your codes are.
When you are coding in MG-Picker Studio, try not to hard code things as best as you can.
7. There are always differences between different rigs.
For example, new rig has some new controls, yet doesn't have some controls from the old rig, so you gotta delete some buttons, also add some new buttons.
8. Test all the picker buttons, sliders to see if they work properly.
Don't forget to press "Ctrl+S" to save the edit :)